Showing posts with label Linux. Show all posts

Tuesday, September 30, 2014

Passing Environment Variables

In this blog I show you how to set ssh and sudoers for passing environment variables on Linux machines. We use it to set the name of the administrator who commits the changes to the repository (see gitkeeper).


Example


Client side

~/.bashrc
...
export GIT_AUTHOR_NAME="Tomas Jurman"
...

~/.ssh/config
...
SendEnv GIT_*
...


Server side

/etc/SSHD_HOME/sshd_config
...
AcceptEnv GIT_*
...

/etc/sudoers
...
Defaults        env_reset
Defaults        env_keep +="GIT_AUTHOR_NAME"
...

Tuesday, July 8, 2014

Git - post commit hook

Git Hooks is powerful tool for customizing Git. In this post we created custom post-commit hook, that send email after every new commit.


Client side hooks

  • pre-commit is called before a commit occurs.
  • prepare-commit-msg lets you edit the default message before the editor is fired up; it's useful in automated commits to add some context.
  • commit-msg is the last step where you can interrupt a commit.
  • post-commit is executed after a commit is completed, for notification purposes.
  • post-checkout you can use it to set up your working directory properly for your project environment.
  • post-merge you can use it to restore data in the working tree that Git can’t track, such as permissions data.


Server side hooks

  • pre-receive can be used to check and interrupt the receival of the new commits, if it is the case.
  • post-receive notifies that commits have been published on this repository.
  • update is a version of pre-receive that is run once per each different branch.
  • post-update is a notification activated after all references have been updated; the default hook updates some metadata to let the repository be published via HTTP.


For detailed description and other not mentioned hooks go to git documentation.


There are already published some post-receive hook for sending email after push new data to server (1, 2, 3).  


Send emails after commit on the client side is not typical use case. On Linux servers we let store the /etc in a Git. After changing the configuration we commit changes to ( for the server local ) git repository. After every configuration changing we want to notify the other administrators. We use the following post-commit hook:


After copy a new post-commit file to .git/hooks don’t remember reinit git:
#git init

Wednesday, May 14, 2014

Setting environment variables in Linux

In this post I take a closer look at setting environment variables in Linux. For this purpose, it is common to use the /etc/profile for the system, or ~/profile for the user settings.

Setting environment variables from ordinary bash script is rarely used and that is why this behavior may be for someone surprising.

Print your environment variables
$ env

Environment variables can be set for:
  • System
  • User
  • Current bash process and sub-processes

System

Interactive login shell first reads and executes commands from the file /etc/profile, if that file exists.

Some Linux systems now use a directory /etc/profile.d/; any .sh files in there will be sourced by /etc/profile.

User

After reading /etc/profile, it looks for ~/.bash_profile, ~/.bash_login, and  ~/.profile,  in  that order,  and  reads  and  executes  commands  from the first one that exists and is readable.

Process and subprocesses

$ export DB_URL=mongodb://localhost:27017/testaBD

It affect current bash process and subprocesses.

When you export variables in a bash script:

  1. It opens a new shell.
  2. It executes commands.
  3. It copies the output back to your current shell.
  4. It closes the new shell.

Any changes to environment will take effect only in the new shell and will be lost once the new shell is closed.

It's important to note that exporting a variable doesn't make it available to parent process. That is, specifying and exporting a variable in a spawned process doesn't make it available in the process that launched it.

Source a bash script

$ source script.sh

Sourcing the script does not create a new shell. All commands are run in the current shell and changes to the environment take effect in the current shell. When you source the script you are typing the commands in your current shell. Any changes to the environment will take effect and stay in your current shell.

Thursday, April 3, 2014

Convert PFX certificate from Windows XP to Windows 7 or Windows Server 2008

It is known that compatibility between version of MS Windows is poor. The best way is to leave MS Windows, but it is not sometimes possible. In this post I am going to describe how to solve problem of incompatibility between certificate in Windows XP and higher versions like Windows 7 and Windows Server 2008 and other.

Use cases
  • User of MS Windows XP migrates to Windows 7.
  • User of Windows XP connects to remote application on Windows Server 2008.

Problem description
User exports your certificate in PFX format on Windows XP and wants to import it to Windows 7 or Windows Server 2008. User receives the following error message:

An internal error occurred. This can be either the user profile is not accessible or the private key that you are importing might require a cryptographic service provider that is not installed on your system.


Solution 

Use OpenSSL Toolkit for converting certificate to another format. OpenSSL is available for many various OSs.

Create new PFX Check expiration date

Format description

PEM
The PEM format is the most common format that Certificate Authorities issue certificates in. PEM certificates usually have extentions such as .pem, .crt, .cer, and .key. They are Base64 encoded ASCII files and contain "-----BEGIN CERTIFICATE-----" and "-----END CERTIFICATE-----" statements. Server certificates, intermediate certificates, and private keys can all be put into the PEM format.

PKCS#7/P7B
The PKCS#7 or P7B format is usually stored in Base64 ASCII format and has a file extention of .p7b or .p7c. P7B certificates contain "-----BEGIN PKCS7-----" and "-----END PKCS7-----" statements. A P7B file only contains certificates and chain certificates, not the private key.

PKCS#12/PFX
The PKCS#12 or PFX format is a binary format for storing the server certificate, any intermediate certificates, and the private key in one encryptable file. PFX files usually have extensions such as .pfx and .p12. PFX files are typically used on Windows machines to import and export certificates and private keys.

Tuesday, August 13, 2013

Converting video for web with FFmpeg

The plight of the HTML5 video format is bad and it looks like that will soon not change.


Formats overview:
  • WebM ( video codec: VP8, audio codec: Vorbis )
  • OGG ( video codec: Theora, audio codec: Vorbis )
  • MP4 ( video codec: H.264, audio codec: ACC/ MP3 )
  • Flash video ( video codec: H.264, audio codec: ACC/ MP3 )


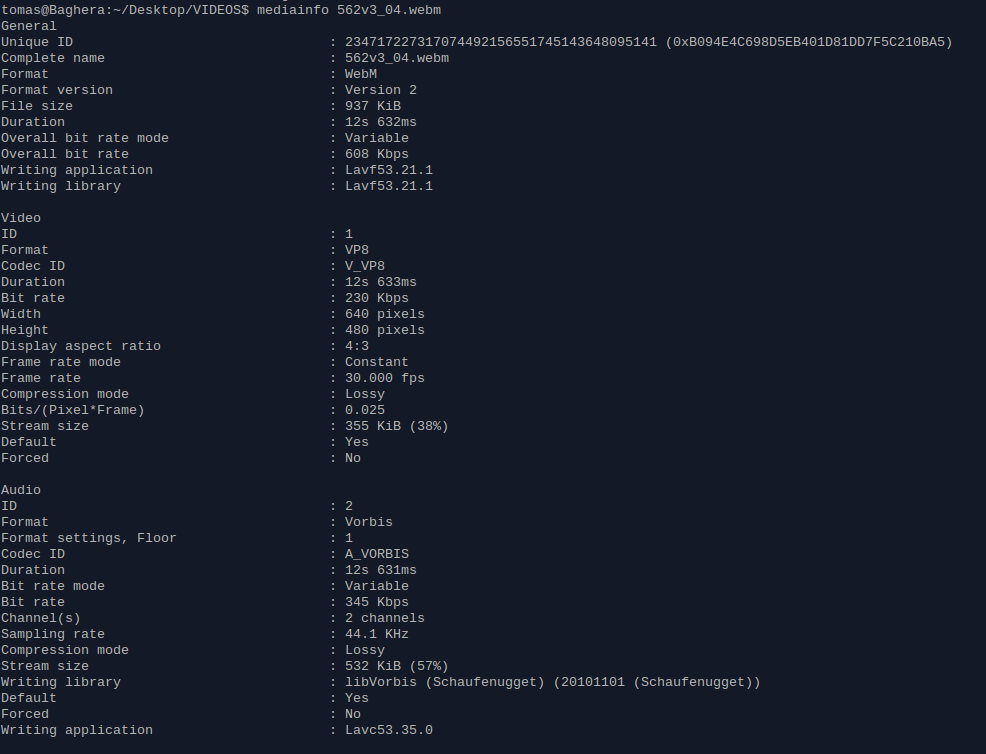
MediaInfo
MediaInfo is a tool for reading video files metadata. Using it is very simple:


FFmpeg
FFmpeg is tool for converting audio and video files. It uses libavcodec library. Converting video files with FFmpeg to required formats ist simple:


WebM
ffmpeg -i INPUT_FILE -acodec libvorbis -vcodec libvpx -b 400k OUTPUT_FILE.webm


OGG
ffmpeg -i INPUT_FILE -acodec libvorbis -vcodec libtheora -b 400k OUTPUT_FILE.ogg


MP4
ffmpeg -i INPUT_FILE -acodec libfaac -vcodec libx264 -b 400k OUTPUT_FILE.mp4


Parameters:
  • -acodec: audio codec, or -c:a in new release of FFmpeg
  • -vcodec: video codec, or -c:v in new release of FFmpeg


There are a lots of others interesting parameters.


libfaac
For the libfaac codec you need the FFmpeg compiled with --enable-libfaac. For more details read FFmpeg Wiki. Or you can use libvo_aacenc codec:
-acodec libvo_aacenc


Bash script for converting video
For painless conversions you can use a prepared bash script.


Use:
  • ./web_video_converter.sh MY_VIDEO_FILE.avi
  • ./web_video_converter.sh FOLDER_WITH_VIDEOS

Monday, April 25, 2011

DCS-950G streaming in Linux

Yesterday I got IPcam DCS-950G. I wanted to connect camera to Motion but it did not get stream. I had to use stupid IE only. I was angry and looking for solution. I found people just as disappointed as I am. I decided to solve this problem.

I went to D-Link and study specification. After that I downgrade camera to DCS-950G_ A1_Firmware_v1.00 because the camera with this old firmware does not need admin authentication for streaming. It's so convenient. I do not have to send with each request the password.

I wanted to write a Groovy script, but I wanted to control the camera from the router, which I do not have Java. That's why I chose Bash.

After hours of testing, I had written a working script:

#!/bin/bash
#

WEBCAM_IP="192.168.0.20"

#######################################################################

#init
{ exec 3<>/dev/tcp/${WEBCAM_IP}/5000; echo -n "ARAGORN_INIT" >&3; cat <&3> /dev/null; } &

sleep 2

#start
exec 3<>/dev/tcp/${WEBCAM_IP}/5001
echo -n "ARAGORN_START#255055293901165#0#1#0" >&3

#data
while :
do
 
    head -c 40 <&3 > header.hex
    BYTES=( `hexdump -v -s 24 -n 4 -e ' 1/1 "%02X " ' header.hex` )      
    HEX="${BYTES[3]}${BYTES[2]}${BYTES[1]}${BYTES[0]}"   
    DATA_LENGTH=`echo "obase=10; ibase=16; ${HEX}" | bc`  
    head -v -c "${DATA_LENGTH}" <&3
                                
done


With MPlayer I can play the stream directly from the camera. Mplayer takes around 5% CPU on a single camera. 
./dcs-950G.bash | mplayer - -demuxer mpeg4es


With ffmpeg I got every second  actual jpeg for Motion.

Sunday, July 18, 2010

Git a nutshell

I read
http://progit.org/

I use
http://nbgit.org/

Install


Package name
$ yum install git-core
$ apt-get install git-core

Global setting
$ git config --global user.name "John Doe"
$ git config --global user.email johndoe@example.com

Local


Creating Repository
  1. init
  2. clone
a)
//go to project folder:
$ git init

b)
$ git clone git://github.com/schacon/grit.git myDestinationFolderName

Ignore files
//cat .gitignore
doc/*.txt
*.log

Add files
$ git add [file name, folder name, or wildcard]
$ git add submodule1/PrimaryClass.java
$ git add .
$ git add *.java

Committing
$ git commit –m ”your commit message”

Status
$ git status

What's changed
$ git diff

Remove
$ git rm log/\*.log

Show history
$ git log

Show tags
$ git tag

Tags
  1. annotated
  2. lightweight
a)
Add tag
$ git tag -a v1.4 -m 'my version 1.4'

Show tag
$ git show v1.4

b)
Add tag
$ git tag v1.4-lw

Remote


Show remote repositories
$ git remote -v

Add new remote repository
$ git remote add pb git://github.com/paulboone/ticgit.git

Fetch
To retrieve remote changes without merging
$ git fetch [name of remote repository]

Pull
Pulling is the combination of a fetch and a merge.
$ git pull
$ git pull [remote name]
$ git pull [remote name] [branch name]

Send your work to remote repository
$ git push origin master

Search remote repository
$ git remote show origin

Rename remote repository
$ git remote rename pb paul

Remove remote reposirory
$ git remote rm paul

Send tag to remote repository
$ git push origin v1.5
or
$ git push origin --tags

Branching


Show branches
$ git branch -a

Create new branch
$ git branch [new branch name] [from branch]
$ git branch [new branch name]

Choosing a Branch
$ git checkout [branch name]

Merging
$ git checkout master
$ git merge hotfix

Delete branch
$ git branch -d hotfix

Send local branch "serverfix" to remote branch "awesomebranch"
$ git push origin serverfix:awesomebranch